yoga at home
I got into yoga as a college student on a typically tight budget. To save money I decided to memorize my favorite sequence and practice at home. It was love at first Sun Salute. But not so much in class, where I obediently followed along, trying my best to keep up with a fast-moving flow, diligently taking the inevitable corrections, and silently cursing the woman next to me who was clearly related to Gumby.
Practicing at home gave me the time and the freedom to play in the poses and see how my body reacted. “You can feel when a pose is right and when it’s a little off,” says Barbara Benagh, a Boston yoga instructor and home practice veteran. “If it doesn’t feel right, it doesn’t matter how good it looks.” My first uncertain, bumbling adjustments eventually guided me to a better understanding of yoga as well as my own strengths, limitations, and needs.
Think of yoga, especially a home practice, as a learning process. There will be fits and starts, but you’re not alone in your struggle for consistency. “Sometimes the challenge is doing it at all,” admits Benagh. But once you step on the mat, you can let the practice take shape. Whether you stick to a specific sequence or just muddle through a few of your favorite poses, you’re still doing yoga. Give yourself permission to explore the poses that attract you and, just as importantly, those that you resist. Tune into how your breath feels, where your mind goes, and the sensations that each pose invites. Avail yourself of books, DVDs, and websites (see “At-home helpers” on page 58 for suggestions), and go at your own pace. Once in a while get a yoga checkup by going to a class that emphasizes adjustments or splurging on a yoga private session.

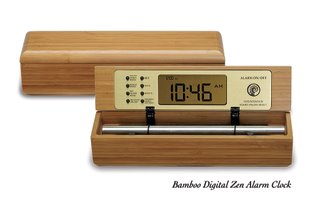
yoga at home, use a yoga timer tool from Now & Zen
The bonuses of a steady practice may surprise you—improvements in your health, strength, flexibility, and general quality of life. A new study published in the Journal of Alternative and Complementary Medicine reports that just one week of daily yoga practice increases spinal flexibility and decreases pain in people suffering from chronic low back pain. Plus you’ll strengthen your body’s ability to fight disease: A 2007 study analyzing antioxidant levels in the blood found that study participants who had practiced yoga for six months had significantly higher levels of free radical–fighting antioxidants in their blood than the control group.
My home practice was born of financial limitation, but I’ve stuck with it for many different reasons: self-nurturing when I’m feeling down or during that-time-of-the-month, a busy schedule, convenience, a chance to work on difficult poses in the privacy of my own home (with no Gumbies around). Whatever inspires you to begin a home practice, this easy-to-follow guide can help you succeed.
The yoga of distraction
You don’t need a private studio to have a successful home practice. But it does help to create a space you can come back to where you feel comfortable and focused. Distracted by a cluttered room? Take five minutes to tidy up before stepping on the mat; it can be a great way to center yourself for each session. Have trouble staying put? Benagh suggests you use music—just practice for the length of one album or playlist—to provide some structure as well as motivation to stick it out. But she reminds us that, “one element of yoga is discipline and exertion. Be patient with the process, and you will build stamina by continuing to persevere even when you get discouraged.”

Kid Yoga Lotus Pose
Focus on the breath
Yoga’s mindful breathing sets it apart from most other forms of exercise. This diaphragmatic or belly breathing begins in the abdomen rather than the chest, pulling the air deeper into the lungs, which fosters more complete oxygen–carbon dioxide exchange. To tune in to your breath, sit comfortably, and rest your hand on your belly. As you inhale, feel your belly filling up with breath; as you exhale, allow your belly to empty.
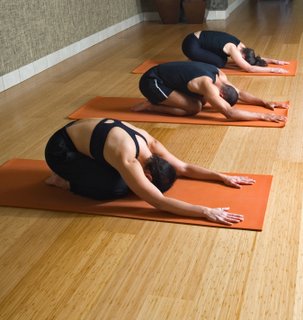
By linking your inhale and exhale to your movements, you can use the breath as a powerful guide for your yoga practice. Pay attention to the quality of the breath. If it feels jagged, you may be working too hard. Ease up or go into Child’s Pose until you feel ready to move again. If your breath becomes very slow or lazy, you may be losing focus. Challenge yourself to stay more alert and active in your practice. If at any point you lose track of your breathing, that’s OK. Just notice it, and come back.
Build a sequence
A balanced sequence of poses moves your body and spine through its full range of motion—circulating oxygen-rich blood, eliminating toxins, stretching and lubricating the entire body. Every asana (body) falls into at least one, and sometimes several, of eight categories—standing, balancing, forward bends, backbends, hip openers, twists, inversions and restoratives. Each type offers different benefits, challenges, and insights.
Standing postures ground your energy, revitalize the legs, improve balance and digestion, build bone density, and lubricate joints. * Balancing postures improve balance, build bone density, focus the mind, and strengthen the joints. * Backbends open the chest and heart, relieve depression, keep the spine supple, and energize body and mind. * Forward bends soothe the nervous system, release tension in the back, and promote sound sleep. * Hip openers promote pelvic, prostate, and reproductive health and reduce sciatic pain. * Twists lubricate the spine and tone and detoxify the organs. * Inversions tone and relax the organs, recirculate blood, center the mind, and improve concentration. * Restorative postures do exactly that: Restore mind and body and reduce stress and tension.

yoga practice
The four Bs
* Blocks help you maintain proper alignment while you build strength and flexibility. * A belt supports you in restorative poses and helps you stay aligned and safe as you stretch. * A bolster supports your body in passive, restorative poses. * A blanket can be used in lieu of or in addition to a bolster to make you more comfortable and help you relax.
Now you’re ready to go. Try the following sequence, courtesy of yogis Rodney Yee and Colleen Saidman, creators of the Gaiam Yoga Club, an online community offering healthy home practices anyone can do.
1. Mountain Pose
(Tadasana)
How to: Stand with your feet parallel, heels slightly apart, and big toes touching. Broaden your collarbones, press your shoulder blades into the back to open up your chest, and place your arms by your sides. Lengthen through the sides of your waist, and balance your head over your shoulders, feeling a sense of ease (and no tension) in the neck. Breathe here for eight to 10 breaths.
standing pose
2. Tree Pose (Vrksasana)
How to: From Mountain Pose, bring your right foot up and press it against the inside of your left thigh or calf, or rest your right heel on the inside of your left ankle. Keep your hips facing the front and your right knee opening out to the side. Stay here for five to eight breaths; release your right leg to the floor and return to Mountain Pose. Repeat pose on the other side.
Variation: Hold on to the back of a chair or touch the wall for balance if you need to. Caution: Don’t rest your foot against your knee as this can cause strain in the joint.
standing; balance; hip opener
3. Standing Forward Bend
(Uttanasana)
How to: From Mountain Pose, exhale and fold from the hips (not the waist), and bring your hands to the floor beside your feet. Keep your knees lifted, relax the low back, and soften the belly. Stay here for five to eight breaths.
Variation: Rest your hands on blocks if they don’t reach the floor; bend your knees to avoid stress on your lower back. Caution: If you have sciatica, you may want to avoid this posture.
standing; forward bend; inversion
4. Downward-Facing Dog Pose (Adho Mukha Svanasana)
How to: From Standing Forward Bend, step your feet back, coming into a plank position (yoga push-up position—arms straight, shoulders over hands, and legs straight so that your body forms a flat plank). Exhale and lift your sit bones toward the ceiling, pressing into your palms and inner arms. Keep the kneecaps lifted; reach your heels toward the floor. Stay here for five to eight breaths, and work up to 15 breaths. Step your right foot between your hands, then your left foot, returning to Mountain Pose.
Variation: Rest your forehead on a block (to ease a headache, calm your nerves, or cool a hot flash).
standing; inversion
5. Triangle Pose (Trikonasana)
How to: From Mountain Pose, step your feet about 3 to 4 feet apart. Turn your left foot slightly inward and your right foot out 90 degrees; the heel of your right foot should be in line with the heel of your left. Stretch your arms out to the sides, lift up through the front of your thighs, and press your shoulder blades into your back to open your chest. Exhale, and keeping both sides of your waist long, extend your trunk to the right and bring your right hand down to your shin or a block. Stretch your left arm up to the ceiling. Look straight ahead or up at your left hand. Rotate your belly toward the ceiling. Hold for five to eight breaths. On an inhalation, lift up and turn your feet back to a parallel position. Repeat on your left side, then turn your toes forward and step back into Mountain Pose. Note: The object is to support and open the chest by keeping your spine and waist long. Don’t worry about bringing your hand all the way down to the floor.
Variation: Place a block on the outer edge of your right foot to support your hand.
standing; hip opener; twist
6. Extended Side Angle Pose
(Utthita Parsvakonasana)
How to: From Mountain Pose, step your feet out slightly wider than you did for Triangle Pose. Turn your right foot out 90 degrees and your left foot slightly inward. The heel of your left foot should line up with the heel of your right. Stretch your arms out to the sides, exhale, and bend your right knee so that your thigh is parallel to the floor. On your next exhale, extend your trunk to the right, keeping both sides of your waist long, and bring your right hand down to a block (or rest your elbow on your thigh). Stretch your left arm up over your left ear, rotate your belly toward the ceiling, and look up under your armpit. Breathe and hold this pose for five to eight breaths. Inhale as you lift up, and straighten your torso. Repeat on the left side and then step back into Mountain Pose.
Caution: Don’t do this pose if you have arthritis of the knee or very low blood pressure.
standing; hip opener; twist
7. Cobra Pose (Bhujangasana)
How to: Lie flat on your stomach, forehead on the floor. Bring your hands beside your chest so that your forearms are perpendicular to the floor and your elbows are tucked in to your sides. Inhale, lift up from your chest, elongating your waist and spreading your collarbones wide. (You should not feel a pinch in your lower back in this gentle backbend). Keep your legs active and pelvis on the mat. Hold for five to eight breaths. On an exhalation, release back into the floor, turn your head to the side and rest for a moment before repeating.
Caution: Do not do this pose if you are more than three months pregnant.
backbend
8. Bound Angle Pose (Baddha Konasana)
How to: Sit with your back straight and your belly lifted. Bend your legs, and bring the soles of your feet together in front of you, allowing your knees to open out to the side. Hold your ankles, and draw your heels toward your pubic bone. Gently lower your knees as far as possible. Put your hands on the floor behind you to sit up taller and encourage the natural curves of the spine. Stay here for eight to 10 breaths.
Variation: Sit with hips on a folded blanket or a bolster and feet on the floor if your knees come up higher than your waist. Place a block under each thigh.
hip opener 9. Simple Seated Twist Pose
(Parivrtta Sukhasana)
How to: Sit cross-legged on the mat. Lengthen through the sides of your waist and elongate your spine. Place you left hand on your right knee and bring your right hand to the floor behind you. Keeping your hips facing straight ahead, begin twisting to the right from your belly first, then your ribcage, chest, and shoulders. Look over your right shoulder. Stay here for five to eight breaths. Come back to the front and repeat on the other side.
Variation: Place a block behind you to support your hand; sit up on a folded blanket with your knees and feet on the floor.
Caution: Avoid this pose if you have a cold or congestion in your chest.
twist
10. One-Legged Forward Bend (Janu Sirsasana)
How to: With your legs stretched out in front of you, bend your left knee and place your left foot on the inside of your right leg, near your groin. Keeping the right leg straight, turn your abdomen and chest so your sternum is in line with the center of your right leg. Inhale and stretch up. Exhale as you reach your arms out in front of you, and fold your trunk forward over your right leg. Stay here for at least eight breaths or longer if you like.
Variation: If you have tight hamstrings, wrap a belt around the base of your right foot and hold onto it as you fold forward. For a more restorative pose, put a bolster on your outstretched leg and rest your head and arms on the bolster.
Caution: Don’t do this pose if you have sciatica.
forward bend; twist
11. Corpse Pose (Savasana)
How to: Lie on your back with your legs stretched out in front of you. Rest your arms at your sides, slightly away from your torso, palms facing up. Actively stretch your arms and legs away from you, then allow them to release completely. Close your eyes, and let everything relax. Let your breathing become natural and effortless. Rest here for five to 10 minutes.
Variations: Place a folded blanket or bolster under you knees to release the back muscles. Cover up with a blanket if you feel cold. You can also use an eye pillow to help the eyes and brain relax.
Use our unique “Zen Clock” which functions as a Yoga Timer. It features a long-resonating acoustic chime that brings your meditation or yoga session to a gradual close, preserving the environment of stillness while also acting as an effective time signal. Our Yoga Timer & Clock can be programmed to chime at the end of the meditation or yoga session or periodically throughout the session as a kind of sonic yantra. The beauty and functionality of the Zen Clock/Timer makes it a meditation tool that can actually help you “make time” for meditation in your life. Bring yourself back to balance.
Adapted from Natural Solutions Magazine, August 2008, by Nora Simmons

Bamboo Zen Chime Clocks & Yoga Timers
Now & Zen – The Yoga Timer Store
1638 Pearl Street
Boulder, CO 80302
(800) 779-6383
Posted in Bamboo Chime Clocks, Chime Alarm Clocks, Now & Zen Alarm Clocks, Yoga Timer, Yoga Timers by Now & Zen